3D Printing airplane wings and other membrane structures May 27 2013
When printing very thin (1-4) layer structures with FDM printers, special issues are sometimes encountered.
Temperature:
It is often helpful to use a slightly higher (3-7 deg C) than normal temperature for the first layer to enhance print leveling, reduce nozzle pressure, and to improve adhesion. Be careful not to raise the temperature to the point where decomposition of the thermoplastic begins, as this can cause nozzle clogging and degraded print quality.
Adhesion:
You will need a bed surface with good adhesion qualities. It must be flat, free of skin oils, and clean. For ABS, Kapton tape cleaned with CPVC-PVC-ABS pipe cleaner compound works well. For PLA, Kapton adhesion is often poor, and can be improved by dissolving a small amount of ABS filament with the solvent swab and wiping down the bed surface with the resulting mixture. Beware that this process will result in extreme adhesion for ABS prints.
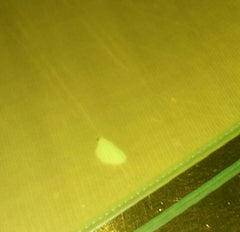
An adhesion void in an otherwise ideal
single layer print. This small defect will
be reinforced by the second layer, so a
reprint will not be necessary in this case.
First layer height:
The first layer height must be adjusted either physically or in software to give .5 to .8 of the normal layer height. Software settings should be made in the print profile to reflect this. This will allow good print leveling characteristics. Layer height and percentage should be adjusted to achieve a print line with approximately 1.25 - 1.5x nozzle diameter, with a flat profile and straight edges.
Bed flatness:
Many times, the print bed is not perfectly flat. Compensation must be made within the first layer to achieve good quality thin prints. This imposes certain constraints on the process, depending on the relative irregularity of your print bed.
Localized sieving caused by a gap
in the tape surface of the bed.
Any variation in bed height within the work footprint should not exceed .5 of your first layer height (layer height x first layer multiplier). Compensation can sometimes be made by increasing your slice layer height within the available constraints. Prints can also be constrained to a more regular area of the bed, or the bed surface can be replaced with a flatter bed.
Bed flatness problems are characterized by variations in print quality depending on its area on the bed, with some areas showing surface curling or stringing while other areas print correctly. Some minor variation may be unavoidable, and often defects will be buried under a following layer if they are not too extreme.
Surface Defects:
Surface defects include surface curling and sieving. Surface curling is characterized by a ribbon type defects along the fill print lines, resulting in a rough, higher than layer height print profile.
Surface curling indicates excessive nozzle pressure. It can be remedied by increasing the physical first layer height (adjusting the end stop), or reducing the software first layer height percentage.

Minor curling caused by insufficient nozzle height.
In this case it was not too severe, but artifacts can
sometimes block the motion of the nozzle,
ruining the print.
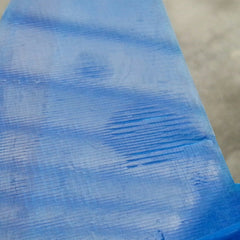
Sieving is characterized by fill that is not bonded to the adjacent filaments and is sieve like and not fully contiguous. This is regularly accompanied by poor adhesion and poor structural characteristics. sieving can be remedied by decreasing the physical first layer height, or increasing the software first layer percentage.

Sieving, here caused by a low spot on the bed.
Nozzle height should be adjusted to give a
workable compromise between the high
and low areas on the print bed.
The favored mechanism for correcting first layer defects is to set the software first layer percentage to .7 of your layer height, and adjust the physical first layer height (end stops) to achieve the desired print quality. Final tuning can then be done in the software setting.
Sometimes print defect types will vary over the surface of the print. This is an usually an indication of poor bed flatness or adhesion problems.
Nozzle Pressure:
It is helpful to be aware of nozzle pressure, especially when printing membranes. High nozzle pressure causes surface curling, poor edge definition, point blobbing, corner artifacts, and stringing artifacts. Insufficient nozzle pressure results in poor adhesion, intermittent voids, and sieve like membranes.
Low nozzle pressure results from excessive physical layer height, improper filament / extruder calibration, or filament drive slippage. Sometimes low temperature can mimic low nozzle pressure by causing drive slippage.
High nozzle pressure results from insufficient physical layer height for the software settings, low temperature, poor filament / extruder calibration, or nozzle blockage.
Elasticity in the printing system, especially on bowden type (indirect) drive extruders can cause artifacting when the conditions causing the pressure buildup are temporarily relieved, such as when the head is lifted.
When printing first layers on an imperfect bed, nozzle pressure will rise as high areas are encountered, restricting flow from the nozzle. System elasticity will then cause excessive plastic to be extruded when this pressure is relieved, such as when a lower portion of the bed is encountered or the nozzle is lifted, sometimes causing gobbing or poor line definition.
In some ways this automatic flow adjustment can actually be helpful, as it creates a leveling effect, extruding less plastic on the high spots, and filling in the low ones with the surplus. The goal is to achieve the best compromise of leveling and print quality, to provide an ideal foundation for the second (and often final) layer in your membrane print.
Elasticity effects can be reduced by reducing the hot area as much as possible by cooling the extrusion barrel, using low elasticity components in your drive and extruder systems, and by careful control of filament retraction parameters.